|
||

Step 5: Running Your Test And Fixing A Failure
Next, we will run our little test to find out whether our implementation is correct. Launch csUnitRunner. You will see as the major component a tab control with three tabs: Test Hierarchy, Output, and Statistics.
For this tutorial we'll look at the test hierarchy. From the menu "Assembly" choose "Add...", which will bring you to the "Load Assembly" dialog. Navigate to the assembly which was created as part of building your project. In my case it is named Go48.core.dll. After loading the assembly I expand the test hierarchy tree, and then the csUnitRunner main form should look similar to this:
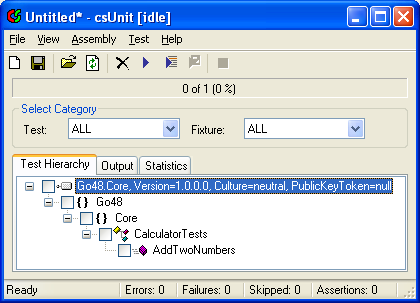
csUnit has loaded the assembly and has scanned it for TestFixtures and tests in them. The root nodes represent assemblies. We have one in this case, named Go48.Core. The rest is also part of the assembly name, but not important here.
For each assembly all namespaces are presented in a hierarchical order. Here we have G48 as the outermost namespace, followed by Core.
Within a namespace the test fixtures found in them are shown along with the tests in them. In this example we have one test fixture, named CalculatorTests and one test named AddTwoNumbers.
Namespaces that don't contain test fixture are not displayed at all.
Let's run the tests. You can start them by either hitting the F5 key, clicking the right-pointing triangle, or by choosing "Run All" from the "Test" menu. You choose.
The result should look similar to the following:
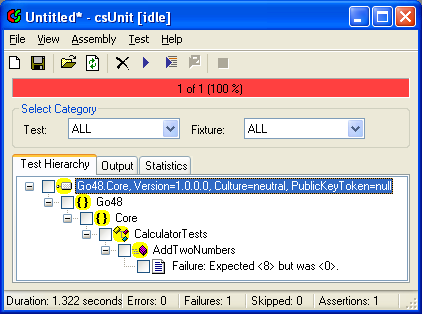
Now this does not really come as a surprise. In this particular case we knew it was coming. So let's fix it by modifying the implementation of the Calculator class as follows:
using System;
using System.Collections.Generic;
using System.Text;
namespace Go48.Core {
public class Calculator {
public void Enter(int value) {
}
public void Add() {
}
public int Top {
get {
return 8;
}
}
}
}
The only thing we changed is the return value of the property "Top" from 0 (zero) to 8. Let's compile the project and see whether our test shows a different result.
After compilation, switch to csUnitRunner and hit F5 again (or use one of the other two options to run all tests). Here is the result:
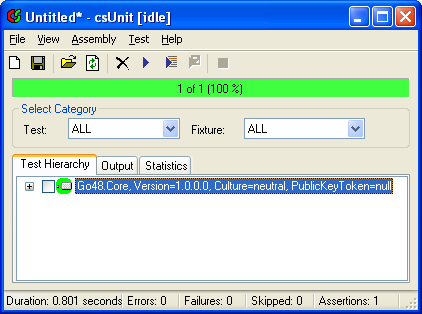
csUnit has automatically reloaded the re-built assembly and executed the tests.
Success! We have managed to implement the functionality as required by the test.
Sponsors:
![]()
![]()
![]()
Sources hosted by
Copyright © 2002-2008 by Agile Utilities NZ Ltd. All rights reserved. Site design by Andreas Weiss. This site is protected by bot traps.